Plate Job
With solid raw supply in hand, we move on to the next two inter-related problems- attaining the proper DC level and getting rid of the ripple and noise. This will require some regulators, or at the very least, more filtration.
Let’s start with the anode supply. The cathode follower will have a power supply rejection of roughly mu +1, so we can tolerate at most 600-700 microvolts of noise before running afoul. Ideally, we’d like it even lower to leave room for other noise sources. There are two basic approaches: active regulation and passive filtering. I’ll present both options and let you decide.
The passive supply is quite a good option for circuits (like this one) that draw a constant current. This approach has the value of simplicity but, as we shall see, the disadvantage of size and cost. Basically, it consists of a series of RC low-pass filters. One can opt for chokes instead of the resistors for a further cost and size penalty, along with radiation issues, for a circuit which does not work better in this application. We will use resistors.
The preamp with passive RC filtering looks like this:
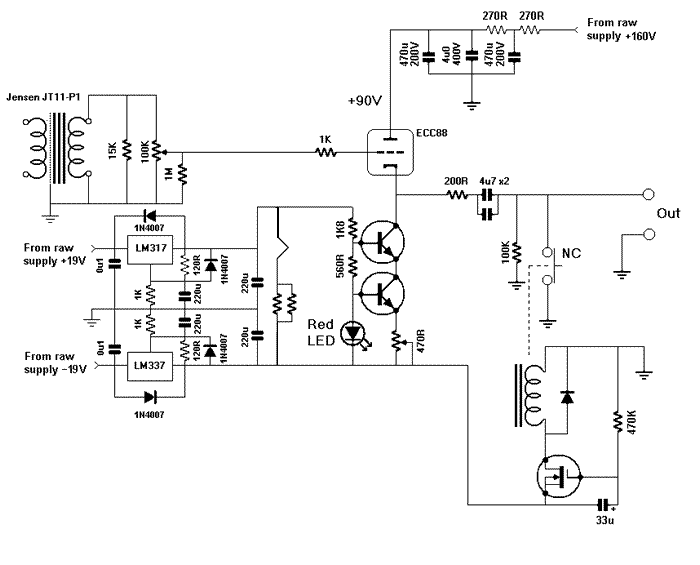
In this implementation, the raw supply’s ripple is knocked down to about 150uV, well within the noise budget. Separate filters should be used for each channel to prevent crosstalk. Separate raw supplies are luxurious and totally unnecessary. The last cap is bypassed with a film capacitor to ensure good decoupling at high frequencies. The filters should be placed as close to the load (the tube) as possible.
For those with a sense of adventure, active supplies are wonderful. They don’t cost much, don’t take up much room, and perform spectacularly well when properly designed. There are a lot of good options to choose from; the Maida regulator, a floating LM317 is a particularly popular choice. Fancier regulators using floating op-amp circuits can also perform superbly, albeit with greater complication. Here, I used instead a very simple two-transistor regulator, chosen for ease of construction and with an eye toward some adventures down the road.
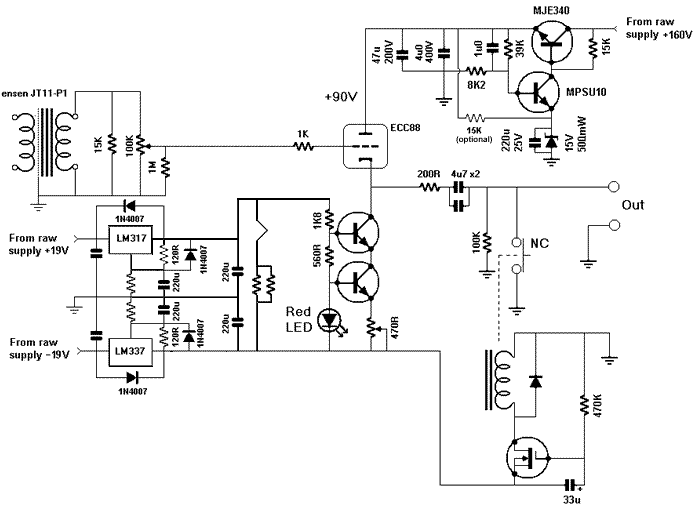
This circuit is set up as a differential amplifier of sorts, the lower transistor acting as an error amplifier comparing a reference voltage from the zener to a divided down output voltage appearing at its base. Its collector sets the base voltage of the pass transistor and hence the output voltage of the regulator.
The divider string features a capacitor bypassing the top resistor in order to increase AC gain of the error amplifier. This cap does not need to be very large to be effective. The Thevenin equivalent of the divider string (with a little Kentucky windage to account for base current) is about 6.5K. A capacitor of 2u will then get within 3dB of ideal bypassing. I didn’t have any appropriately rated capacitors of a size that would fit my little perfboard, so I stepped down to 1u. With that value, ripple voltage on the regulator output was under 100uV, so that wasn’t too bad a let-down from ideal.
The zener is fed by the current flowing through the error amplifier’s emitter- it may be augmented by another 5mA via a 15K resistor tied to the rail if your zener is balky when asked to wake up or it it needs to be worked harder to quiet it down a bit. Build the circuit without it, and if you experience any start-up glitches, put it in. A real stud will eschew a zener and, instead, stack a pair of LM329 references. Either way, the 220u bypass cap is your friend. The noise from the regulator I built was quite comparable to the RC passive filtered version.
The MPSU10 I used for the error amplifier is no longer available. But you can substitute any bipolar transistor with a 1W or better power rating, 200V or higher breakdown voltage, and as high an ft as you can manage. Another MJE340 can be used in a pinch.
The low voltage regulators are quite generic. Please note that there is a good reason not to separate the heater circuit from the other 12V parts of the circuit- the LM317/337 perform better regarding source impedance and noise as the current draw increases (see Errol Dietz’s paper in Electronic Design, December 14, 1989, and reprinted in “Troubleshooting Analog Circuits” by Bob Pease). Since the current sources and the (soon to be added) servo op-amps draw a piddly few 10s of milliamps, the 300-360mA heater draw really helps to make that regulator perform. The input cap is necessary when we put the raw supply in its own box; the 220uF bypass caps on the adjust pin and the output get the noise down to the sub-millivolt level, well under any reasonable need in this application. The most appropriate versions of the 317/337 are the “T” TO-220 packs. They’ll dissipate 3 or 4 watts, so a small heatsink is appropriate. I used 1N4007 diodes for shutdown protection, but nearly any good medium power rectifier will work. If you want to be extra-geeky, use the same high-speed diodes that are used in the rectifier portion of the circuit.
So, with a bit of thought and some pretty conventional circuitry, we have made a power supply that is far better than our requirements. Let’s go have a drink to celebrate.
Men With Toolbelts
Given my total lack of skill in the mechanical aspects of fabrication, I feel a bit like a rabbi recommending brands of bacon. But at least I can explain my worst-case methods. As mentioned previously, I used two Radio Shack plastic boxes to house the preamp and raw power supply, with the aluminum covers providing a crude ground plane. This will probably be upgraded at some point- I think I’ll be living with this unit for quite a while. But for the moment, it works.
The circuitry was built on six small perf boards, each containing a functional block for one channel (current source, B+ regulator/servo, and signal circuitry). This was done so that I could switch various circuit chunks in and out during development. If you want to use this as an experimental base, that’s fine, but a circuit board or proper point-to-point would be a major step up. I’ve got some of those nice Tektronix ceramic/silver terminal strips that will be pressed into service when I do a rebuild. A good circuit deserves more than I’ve given it.
Input and output jacks should, logically enough, be isolated from the chassis- and from one another. Use a high-quality connector here where it counts.
The umbilical from the power supply is terminated with a 5-pin AMP female plug. The corresponding male AMP connector is mounted on the preamp chassis. There’s no technical reason why audio-type connectors couldn’t be used, but I highly recommend you don’t do that- it’s not a matter of if, it’s a matter of when someone will plug the wrong thing in and let out the smoke.
I won’t specify wiring. I don’t think it’s terribly important, but if you do, use whatever flavor you like. To a great extent, I used Morgan Jones’s suggestion (in “Building Valve Amplifiers”) of solid silver wire with Teflon sleeving. I must admit that, with silver-bearing solder, it makes a lovely joint.
Grounding can be done in several ways- some prefer to use a single bus, connected to the chassis at one point. Some prefer star points. Others like to combine the two. Whichever you choose, the isolated nature of the inputs means that the usual ground point near the input jack is unsuitable. The best place to set the ground for this design is at the ground point for the input transformer secondary.
I haven’t diagrammed input switching since that will vary a bit from installation to installation. Use a good quality switch; I used a surplus Cinema Engineering 5 position two deck rotary switch with shorting between positions for optimal isolation. The input grounds are all tied together and kept completely separate from the preamp ground.
As I mentioned before, I used an Alps Black Beauty volume control. That’s a very, very good second choice. My first choice would be a stepped attenuator. If you’ve got the time and resources to build one, I’d highly recommend it.
I haven’t shown any pilot light circuitry, if you want one, I’d suggest putting a green LED in series with a 4.7K resistor, then putting that string between the +12 and -12 rails. You can also put in an indicator showing when the dethumper fires; I’d probably use a different color LED, put it in series with a resistor as before, and connect that string across the relay coil. When the dethumper unmutes the output, the light will go out.
When building this circuit, it’s best to start it up without the tube in place, loading the current sources with a 1K resistor tacked between the collector and the +12 rail. Adjust the trim-pot to get 10V across the resistor. Then disconnect the resistor, warm in the knowledge that your current source is properly adjusted and may safely be used with your tube.
OK, enough for now. You have all that you need to build a good-sounding unity-gain tube preamp that will be quiet and unobtrusive. If you want to hang on for the ride, things will get a bit more novel in the next part.